AP Unit 15 Solutions
Compare your physical setup and reasoning with these worked solutions. A numerical answer is one check; the assumptions, signs, units and representations explain what it means.
Problem 1
A 600 nm vacuum beam makes an interference pattern on a screen, while a photon counter records individual localized events. Use h = 6.63 × 10⁻³⁴ J·s and c = 3.00 × 10⁸ m/s.
Part a
E = hc/λ = 3.315 × 10⁻¹⁹ J; p = h/λ = 1.105 × 10⁻²⁷ kg·m/s. Fringes require phase-sensitive wave interference; individual interactions are localized packets.
Why this step? Use the vacuum photon relations while matching each model to an observation.
Discrete atomic spectra, measured blackbody spectra, and photoelectric thresholds motivate quantum treatment of atomic-scale matter and energy transfer.
Why this step? These observations exceed a purely classical continuous-energy description.
Answer and check
E = 3.32 × 10⁻¹⁹ J; p = 1.11 × 10⁻²⁷ kg·m/s; interference and separate detections show complementary behavior.
Part b
v = c/n = 2.00 × 10⁸ m/s and λmedium = 600/1.50 = 400 nm. f = c/λ₀ = 5.00 × 10¹⁴ Hz and E = hf remain unchanged.
Why this step? A stationary interface preserves source frequency.
In the uniform medium the ray travels straight until a matter interaction or interface changes it.
Why this step? Propagation direction changes require the interaction/model conditions stated in the problem.
Answer and check
2.00 × 10⁸ m/s and 400 nm; unchanged f and photon energy.
Part c
A photon has zero rest mass and zero electric charge. Its energy is hf and its vacuum momentum is E/c = h/λ, which are nonzero for this beam.
Why this step? Rest mass, charge, energy and momentum are different physical properties; the nonrelativistic expression mv is not a photon momentum rule.
Answer and check
The photon is massless and electrically neutral, yet carries the nonzero energy and momentum calculated in part a. The claim incorrectly applies a matter-particle mv model to a photon.
Scoring and feedback
Problem 2
A slow electron has momentum 3.0 × 10⁻²⁴ kg·m/s. A 0.050 kg ball moves at 2.0 m/s. A model atomic ring has circumference 1.20 nm.
Part a
λelectron = (6.63 × 10⁻³⁴)/(3.0 × 10⁻²⁴) = 2.21 × 10⁻¹⁰ m = 0.221 nm. The ball has p = 0.10 kg·m/s and λ = 6.63 × 10⁻³³ m.
Why this step? Compare h/p using the appropriate momentum for each object.
The electron wavelength is comparable to the structure; the ball’s wavelength is vastly smaller. Electron diffraction/two-slit experiments demonstrate matter-wave behavior.
Why this step? The relevant boundary is wavelength relative to system size.
Answer and check
Electron 0.221 nm; ball 6.63 × 10⁻³³ m. Quantum wave effects matter on the stated structure for the electron.
Part b
C = nλₙ gives λₙ = C/n. Substituting into pₙ = h/λₙ gives pₙ = nh/C, for n = 1, 2, 3, ….
Why this step? The allowed wave must close after an integer number of wavelengths; substituting that boundary condition converts the matter-wave relation into a symbolic permitted-momentum rule.
C = nλ gives λ = 1.20, 0.600, 0.400 nm for n = 1,2,3. Corresponding h/λ values are 5.53 × 10⁻²⁵, 1.11 × 10⁻²⁴, and 1.66 × 10⁻²⁴ kg·m/s.
Why this step? Integer fit restricts allowed wavelengths and associated momenta in the given model.
Allowed bound-state energies are discrete rather than a continuum; the ring is a specified model, not a universal statement about every measured momentum component.
Why this step? State the quantization’s model boundary.
Answer and check
Allowed wavelengths fit integer cycles; arbitrary half-integer fits are excluded.
Scoring and feedback
Problem 3
Consider neutral ²³₁₁Na, neutral ²⁴₁₁Na, and ²³₁₁Na⁺. Electron mass is about 1/1836 of proton mass.
Part a
²³Na: p = 11, n = 12, e = 11, charge 0. ²⁴Na: p = 11, n = 13, e = 11, charge 0. ²³Na⁺: p = 11, n = 12, e = 10, charge +e.
Why this step? A counts nucleons, Z counts protons, and ion charge fixes electron deficit.
Answer and check
The neutral pair are isotopes; Na⁺ differs from neutral ²³Na by one electron.
Part b
All have Z = 11, defining the element. Proton and neutron masses dominate; the 11 electrons have much less total mass than 23 or 24 nucleons. Removing an electron changes the electron configuration and electric charge, affecting interactions.
Why this step? Separate element identity, mass contribution, and electron-dependent behavior.
Answer and check
Proton number fixes the element; nucleons dominate mass; electrons strongly affect interactions.
Scoring and feedback
Problem 4
In a hydrogen Bohr model, an electron orbits at r = 5.29 × 10⁻¹¹ m. Use k = 8.99 × 10⁹ N·m²/C², e = 1.60 × 10⁻¹⁹ C, me = 9.11 × 10⁻³¹ kg, and h = 6.63 × 10⁻³⁴ J·s.
Part a
ke²/r² = mev²/r gives v = √[ke²/(mer)] = 2.19 × 10⁶ m/s. λdB = h/(mev) = 3.32 × 10⁻¹⁰ m.
Why this step? The inward electric force supplies centripetal acceleration; v ≪ c justifies nonrelativistic momentum.
2πr = 3.32 × 10⁻¹⁰ m, so approximately one wavelength fits.
Why this step? The allowed-state condition is integer circumference-to-wavelength ratio.
Answer and check
v ≈ 2.19 × 10⁶ m/s, λdB ≈ 0.333 nm, one wavelength.
Part b
E₁ = −13.6 eV and E₂ = −3.40 eV. The integer matter-wave fit restricts states; force balance alone would not explain discrete levels.
Why this step? Quantization supplements, rather than follows from, the classical force equation.
Use the model for allowed energy levels, especially single-electron systems; orbital shapes and probability functions are outside the AP scope.
Why this step? The historical circular-orbit representation is limited.
Answer and check
The n = 2 state is higher and less tightly bound; the description here ends at energy levels.
Scoring and feedback
Problem 5
A hypothetical single-electron atom has levels E₁ = −10.0 eV, E₂ = −4.0 eV, and E₃ = −1.0 eV. Use hc = 1240 eV·nm.
Part a
Draw horizontal lines at −10, −4, −1 eV with uneven spacing. Gaps are 6.0 eV (2→1), 9.0 eV (3→1), and 3.0 eV (3→2).
Why this step? Arrows represent changes in the energy of the electron–nucleus system.
λ = 1240/ΔE gives 207 nm, 138 nm, and 413 nm respectively. The largest gap gives the shortest λ.
Why this step? One level pair corresponds to one photon frequency/wavelength.
Answer and check
207, 138, and 413 nm; 3→1 is shortest.
| Transition | Photon energy (eV) | Vacuum wavelength (nm) |
|---|---|---|
| 2→1 | 6 | 206.7 |
| 3→1 | 9 | 137.8 |
| 3→2 | 3 | 413.3 |
Levels from bottom to top: -10 eV, -4 eV, -1 eV. The free-electron reference is 0 eV. The green dot marks level 3 as the starting occupied state. The arrows show the set of possible emissions across an ensemble with the needed excited-state populations; they are not three simultaneous emissions by one electron.
Part b
Only 6 and 9 eV match upward gaps from −10 eV. A 3 eV photon fits levels 2 and 3, but neither is the populated starting state. The 8 eV photon matches no bound gap and is below the 10 eV ground ionization threshold.
Why this step? The initial occupied level is part of the transition condition.
Answer and check
6 and 9 eV; possible line differences alone do not guarantee a populated absorption pathway.
| Transition | Photon energy (eV) | Vacuum wavelength (nm) |
|---|---|---|
| 1→2 | 6 | 206.7 |
| 1→3 | 9 | 137.8 |
Levels from bottom to top: -10 eV, -4 eV, -1 eV. The free-electron reference is 0 eV. The green dot marks level 1 as the starting occupied state. Only arrows leaving that occupied ground state are possible in the stated bound-transition model.
Part c
ΔEatom = E₂ − E₃ = −4 − (−1) = −3.0 eV; the emitted photon carries +3.0 eV.
Why this step? The level labels are total energies of the atom; the positive outgoing photon energy balances the negative atomic energy change.
The atom is an electron–nucleus system. Its changed bound quantum state changes the electron–nucleus interaction energy, together with the electron’s kinetic contribution, so the system’s total energy changes. The electron is not a free isolated particle whose energy can be separated from the binding interaction.
Why this step? A bound atomic transition belongs to the coupled system; the claim omits the interaction that produces bound energy states.
Answer and check
The atomic system loses 3.0 eV and emits a 3.0 eV photon. The electron–nucleus interaction energy changes as the bound state changes; the quoted statement is false.
Scoring and feedback
Problem 6
Reference element P has lines at 400, 500, and 650 nm; reference Q has lines at 450, 600, and 700 nm. An unknown dilute source emits 400, 500, and 650 nm within ±2 nm measurement uncertainty. A supplied separate single-electron atom has levels −9.0 and −2.0 eV.
Part a
P matches all three measured lines within uncertainty; Q does not. Shine a broad continuous source through cooler P gas and look for dark bands at the permitted populated transition wavelengths. Multiple consistent matches reduce ambiguity from a coincident line.
Why this step? Each element’s energy-level differences form a characteristic set of frequencies.
Answer and check
P is the better match; an absorption spectrum tests which incident frequencies are removed.
Part b
Binding energies relative to zero are 9.0 eV and 2.0 eV. A 12 eV photon can ionize the ground state; about 3.0 eV remains for kinetic energy if recoil is neglected.
Why this step? The lowest level needs the largest removal energy; above ionization, excess need not match a bound gap.
Answer and check
9.0 and 2.0 eV; ground-state ionization with about 3.0 eV excess.
Scoring and feedback
Problem 7
Two ideal blackbodies have the same area but temperatures T and 2T. Their spectra are plotted as intensity per unit wavelength versus wavelength.
Part a
The hotter curve peaks at half the wavelength and has greater intensity across the spectrum. Its total area is 16 times the cooler curve’s area because emitted intensity is σT⁴.
Why this step? Wien sets peak position; Stefan–Boltzmann sets the summed intensity.
Shade all wavelengths under each curve, rather than measuring only its maximum height.
Why this step? Spectral intensity per wavelength and integrated intensity have different units.
The plotted 3000 K and 6000 K example represents the general T and 2T comparison on the same linear intensity scale. Mark the hotter peak at half the cool peak wavelength; shade each area and label the complete-area ratio 16. The cool curve is much lower on this common scale.
Why this step? A qualitative sketch must connect the labeled wavelength maximum to Wien’s law and the shaded complete spectrum to total intensity, rather than equating peak height with area.
Answer and check
Hot/cool peak λ ratio 1/2; total-area ratio 16.
| λ (μm) | 3000 K spectral intensity | 6000 K spectral intensity |
|---|---|---|
| 0.25 | 0.0000 | 0.2615 |
| 0.483 | 0.0069 | 1.0000 |
| 0.967 | 0.0312 | 0.4043 |
| 2 | 0.0117 | 0.0504 |
| 4 | 0.0016 | 0.0044 |
| Temperature | Peak λ (μm) | Peak height relative to 3000 K | Total intensity relative to 3000 K |
|---|---|---|---|
| 3000 | 0.967 | 1 | 1 |
| 6000 | 0.483 | 32 | 16 |
The vertical scale divides both spectral intensities by the hotter peak height. Shading marks the area under each curve in the displayed interval; the complete area includes the long-wavelength tails beyond 4 μm. The exact total-area ratio 16 follows σT⁴. The 32 peak-height ratio illustrates why one peak height cannot stand in for that area. The construction uses the Planck shape; an AP response uses its qualitative curve and Wien/Stefan–Boltzmann laws, without deriving that shape.
Part b
A blackbody absorbs all incident radiation and emits thermal radiation; at equilibrium energy flow in balances flow out. Planck’s quantized-energy description reproduces the finite observed distribution where purely classical continuous-energy predictions fail.
Why this step? Steady temperature is an energy balance, not an absence of emission.
Answer and check
It emits while energy is replenished; quantum energy exchange explains the thermal spectrum.
Scoring and feedback
Problem 8
Blackbody R has emitting area 0.010 m² and spectral peak at 1.45 μm. Blackbody S has twice that area and twice R’s temperature. Use b = 2.90 × 10⁻³ m·K and σ = 5.67 × 10⁻⁸ W/(m²·K⁴).
Part a
TR = b/λmax = (2.90 × 10⁻³)/(1.45 × 10⁻⁶) = 2000 K; TS = 4000 K. S peaks at 0.725 μm.
Why this step? The plotted wavelength peak determines absolute temperature.
PS/PR = (AS/AR)(TS/TR)⁴ = 2 × 16 = 32.
Why this step? Include area as well as fourth-power temperature.
Answer and check
2000 K, 4000 K, 0.725 μm; S emits 32 times R’s power.
Part b
PR = (0.010)(5.67 × 10⁻⁸)(2000)⁴ = 9072 W. Since T is inversely proportional to peak λ, a 5% λ uncertainty gives about 5% T uncertainty.
Why this step? Use the inverse relation for the uncertainty estimate.
The fourth-power relation magnifies a small relative T uncertainty by about four, giving about 20% P uncertainty. Exact endpoint estimates can be used instead.
Why this step? A nonlinear power law amplifies measurement uncertainty; this is a first-order small-uncertainty estimate.
Answer and check
9.07 × 10³ W; approximately ±5% in T and ±20% in P, ignoring area uncertainty.
Scoring and feedback
Problem 9
A surface has provided work function φ = 2.00 eV. It is illuminated separately by 700 nm and 400 nm light. Use hc = 1240 eV·nm.
Part a
700 nm gives Eγ = 1240/700 = 1.77 eV, below φ, so no emission. 400 nm gives 3.10 eV, so Kmax = 3.10 − 2.00 = 1.10 eV and Vs = 1.10 V.
Why this step? Threshold comparison must precede kinetic-energy subtraction.
Answer and check
No 700 nm photoemission; at 400 nm, Kmax = 1.10 eV and Vs = 1.10 V.
Part b
More subthreshold 700 nm photons still cannot cause emission in the single-photon model. A dim 400 nm beam can still eject electrons when photons are absorbed, but fewer events occur per second. The maximum energy remains 1.10 eV.
Why this step? Light supplies individual packets; flux changes event rate rather than packet energy.
Answer and check
Threshold follows photon frequency/energy, not intensity; the comparison supports quantized transfer.
Scoring and feedback
Problem 10
A vacuum two-plate experiment reports stopping-voltage magnitudes 0.48, 0.90, and 1.32 V for frequencies 6.0, 7.0, and 8.0 × 10¹⁴ Hz. Current at the first frequency increases with intensity.
Part a
Photon-energy conservation gives Kmax = hf − φ. Electric stopping work gives eVₛ = Kmax. Substituting and dividing by e yields Vₛ = (h/e)f − φ/e.
Why this step? Derive the graph model from two physical energy relations before interpreting its slope and intercept.
Slope = (1.32 − 0.48)/(2.0 × 10¹⁴) = 4.2 × 10⁻¹⁵ V·s. The intercept is 0.48 − (4.2 × 10⁻¹⁵)(6.0 × 10¹⁴) = −2.04 V.
Why this step? Vs = (h/e)f − φ/e is linear above threshold.
φ = 2.04 eV; f0 = 2.04/(4.2 × 10⁻¹⁵) = 4.86 × 10¹⁴ Hz.
Why this step? An electron volt corresponds to one electron charge times one volt.
The fitted negative vertical intercept is −2.04 V, but the physical photoemission line begins at f₀ = 4.86 × 10¹⁴ Hz and Vₛ = 0. Below that frequency no ordinary single-photon photoemission occurs.
Why this step? An extrapolated intercept is useful for parameter estimation without predicting negative kinetic energy for an emitted electron.
Answer and check
h/e ≈ 4.2 × 10⁻¹⁵ V·s; φ ≈ 2.04 eV; f0 ≈ 4.86 × 10¹⁴ Hz.
| f (10¹⁴ Hz) | Vₛ (V) |
|---|---|
| 6 | 0.48 |
| 7 | 0.9 |
| 8 | 1.32 |
Above threshold the fitted line is Vₛ = 0.420 fscaled − 2.04 V, with frequency expressed as fscaled × 10¹⁴ Hz. Thus h/e = 4.20 × 10⁻¹⁵ V·s; the horizontal intercept is f₀ = 4.86 × 10¹⁴ Hz. The negative vertical intercept is an extrapolation used to infer φ = 2.04 eV. Below threshold there is no ordinary single-photon emission, rather than an emitted electron with negative kinetic energy.
Part b
Illuminate the emitter with fixed-frequency monochromatic light; sweep the collector potential in the retarding direction to the smallest magnitude where photocurrent vanishes. Keep surface, alignment, intensity during each sweep, and chamber conditions controlled.
Why this step? The field must prevent even the highest-energy photoelectrons from reaching the collector.
Voltage calibration and the current-noise/background criterion affect the stop estimate; source frequency bandwidth can broaden electron energies. More photons produce more electrons but leave hf − φ unchanged.
Why this step? Distinguish flux-dependent current from frequency-dependent maximum energy.
Answer and check
Use retarding magnitude and uncertainty intervals; intensity changes current, not ideal Vs.
Scoring and feedback
Problem 11
A 20.0 pm photon travels along +x and scatters at +60° from a free electron initially at rest. Use h = 6.63 × 10⁻³⁴ J·s, c = 3.00 × 10⁸ m/s, h/(mec) = 2.43 pm, and 1 eV = 1.60 × 10⁻¹⁹ J.
Part a
Δλ = 2.43(1 − 0.5) = 1.215 pm, so λ′ = 21.215 pm. Since f = c/λ, outgoing frequency is lower.
Why this step? The Compton shift is nonnegative for a resting electron.
ΔE = hc(1/20.0 pm − 1/21.215 pm) = 5.70 × 10⁻¹⁶ J ≈ 3.56 keV.
Why this step? Photon energy loss is the electron kinetic energy gain in the stated model.
Answer and check
λ′ = 21.215 pm; lower f; transferred energy about 3.56 keV.
Part b
pi = h/λ = 3.315 × 10⁻²³ and pf = h/λ′ = 3.125 × 10⁻²³ kg·m/s. Electron px = pi − pf cos60° = 1.75 × 10⁻²³; py = −pf sin60° = −2.71 × 10⁻²³ kg·m/s.
Why this step? Conserve each component with the initially resting electron’s momentum zero.
|pₑ| ≈ 3.22 × 10⁻²³ kg·m/s and angle ≈ 57.1° below +x. The outgoing photon vector plus electron vector equals the incoming +x vector.
Why this step? The transverse components cancel while the x components add.
Answer and check
pₑ ≈ (1.75, −2.71) × 10⁻²³ kg·m/s, at −57.1°.
| Vector | x (10⁻²³ kg·m/s) | y (10⁻²³ kg·m/s) |
|---|---|---|
| Incoming photon | 3.315 | 0 |
| Outgoing photon | 1.563 | 2.706 |
| Recoil electron | 1.752 | -2.706 |
| Outgoing sum | 3.315 | 0 |
The incoming photon runs right from the common tail. The outgoing photon runs at +60°. The electron vector begins at the outgoing photon head and ends at the incoming photon head; its physical direction is -57.1° from +x. Translating a vector for a head-to-tail sum does not move its physical scattering origin. The target is a free electron initially at rest.
Scoring and feedback
Problem 12
Photons of vacuum wavelengths 10 pm and 100 pm are each scattered through 0°, 90°, and 180° by free electrons initially at rest.
Part a
For both inputs the shifts are 0, 2.43, and 4.86 pm. Outgoing wavelengths are 10,12.43,14.86 pm for the first beam and 100,102.43,104.86 pm for the second.
Why this step? The angle-dependent shift contains electron mass but not incoming wavelength.
At a given angle the 10 pm beam has ten times the fractional shift; the absolute shifts are equal.
Why this step? A percentage comparison must divide by the original wavelength.
Answer and check
Equal absolute shifts at each angle; different fractional shifts.
Part b
The resting-free-electron model predicts +2.43 pm at 90°, so −2 pm is incompatible. Check wavelength calibration, angle labeling, or whether the electron was initially moving/another process occurred.
Why this step? A model discrepancy identifies assumptions rather than permitting a negative 1 − cos θ.
Valid shifts follow energy and vector momentum transfer between a photon and electron, supporting discrete photon energy/momentum.
Why this step? The collision model predicts a direction-dependent wavelength change.
Answer and check
The observation does not fit the stated model; inspect measurements and initial conditions.
Scoring and feedback
Problem 13
Use the supplied channels ²₁H + ³₁H → ⁴₂He + ¹₀n and ²³⁵₉₂U + ¹₀n → ¹⁴¹₅₆Ba + ⁹²₃₆Kr + 3¹₀n. A separate binding calculation provides atomic masses mH = 1.007825 u, mn = 1.008665 u, and mHe-4 = 4.002603 u.
Part a
The first combines nuclei and is fusion: A 2+3 = 4+1 and charge 1+1 = 2+0. The second splits a heavy nucleus and is fission: A 235+1 = 141+92+3 and charge 92 = 56+36.
Why this step? Nucleon bookkeeping includes emitted and incident neutrons.
Short-range strong binding and electric repulsion/energy barriers constrain nuclei. Some fission is spontaneous; other pathways need capture or excitation to reach the splitting configuration, even if final rest mass is lower.
Why this step? Triggering conditions and net Q are different physical quantities.
Answer and check
Fusion and fission; both channels balance A and charge. Positive net release alone does not remove an activation barrier.
Part b
Δm = 2mH + 2mn − mHe = 0.030377 u. B = Δm × 931.5 = 28.30 MeV.
Why this step? Use all two protons and two neutrons in the separated inventory.
Two neutral H atoms and neutral He each contain two electrons, so electron rest masses cancel; electronic binding differences are neglected.
Why this step? A consistent atomic-mass convention prevents an electron-mass error.
Answer and check
B ≈ 28.30 MeV, not a proton-only mass difference.
Part c
Q = 0.020 × 931.5 = 18.63 MeV. Energy appears as kinetic energy of products and/or photons; total energy including rest energy remains conserved.
Why this step? Rest mass difference is converted rather than total energy being lost.
Vector momenta of all products, including recoil and emitted photons, must sum to the initial system momentum.
Why this step? A photon or energetic light product requires balancing recoil.
Answer and check
18.6 MeV released; total energy and momentum conserved.
Scoring and feedback
Problem 14
A closed sample begins with 1600 parent nuclei. Its supplied half-life is 3.0 h. A second isotope’s half-life is 3.0 × 10⁹ years.
Part a
λ = ln2/3.0 = 0.231 h⁻¹. N(7.5 h) = 1600(1/2)²·⁵ = 283 expected nuclei.
Why this step? Fractional half-life intervals require an exponential rather than integer rounding.
At 0,3,6,9 h expected N is 1600,800,400,200. The absolute decrease slows, while each 3 h interval halves the remaining population.
Why this step? Plot an exponential survival curve rather than a straight descending line.
Answer and check
λ ≈ 0.231 h⁻¹; N ≈ 283 at 7.5 h.
| Time (h) | Expected parents | Log ratio |
|---|---|---|
| 0 | 1600 | 0.000 |
| 3 | 800 | -0.693 |
| 6 | 400 | -1.386 |
| 9 | 200 | -2.079 |
| 12 | 100 | -2.773 |
Each interval of 3 h halves the remaining amount. The ordinary curve bends upward toward zero; its absolute decrease gets smaller. The log graph is a straight line of slope −ln2/3 = -0.231 h⁻¹. These are expected counts for an ensemble; they do not predict the exact time of a particular nucleus’s decay.
Part b
t = ln10/0.231 = 9.97 h, about 10.0 h. The initial amount must be justified and parents must not have entered or left by other processes.
Why this step? Dating inverts survival and depends on a closed-system history.
Answer and check
About 10.0 h under the known-initial-amount and closed-system assumptions.
Part c
The provided half-lives differ enormously; one predicts substantial changes in hours and the other in billions of years. Four nuclei have expected survivors two after one half-life, but actual counts fluctuate and no individual time is determined.
Why this step? Half-life belongs to an isotope and describes probability across an ensemble.
Yes. Radioactive decay can lower the energy of the same nucleus by gamma emission, consistent with the current definition.
Why this step? A spontaneous nuclear state change need not alter A or Z.
Answer and check
Timescales vary by isotope; two is an expectation, not a guarantee; gamma can leave the isotope unchanged.
Scoring and feedback
Problem 15
A supplied ²²⁶₈₈Ra nucleus undergoes alpha decay; its daughter is left excited and later emits a gamma photon. The decay mode is provided, not a memorization task.
Part a
²²⁶₈₈Ra → ²²²₈₆Rn* + ⁴₂He. A: 226 = 222+4; Z: 88 = 86+2.
Why this step? The alpha removes two protons and two neutrons.
The alpha is a helium-4 nucleus, charge +2e, containing 2 protons and 2 neutrons, not a neutral atom.
Why this step? Use the required He-4 alpha model.
Answer and check
²²²₈₆Rn* and ⁴₂He²⁺; nucleon and charge counts balance.
Part b
²²²₈₆Rn* → ²²²₈₆Rn + γ. A and Z stay the same while excitation decreases; photon momentum gives the daughter a recoil.
Why this step? Gamma carries nuclear energy without nucleons or charge.
Possible modes depend on the isotope’s energy and stability. A balanced equation is necessary but not sufficient; modes and half-lives are supplied rather than memorized.
Why this step? Physical accessibility requires more than formal count balance.
Answer and check
Same radon isotope, lower nuclear energy; isotope-specific energy conditions select possible decay.
Part c
Alpha lowers A by 4 and Z by 2. Beta-minus keeps A and raises Z by 1. Beta-plus keeps A and lowers Z by 1. Gamma keeps both A and Z while lowering excitation of the same nucleus.
Why this step? Count nucleons and charge for each mode, then distinguish gamma energy-state change from isotope transformation.
Answer and check
Alpha, beta-minus, beta-plus, and gamma have distinct A/Z transformations; all conserve total inventories with emitted products included.
Scoring and feedback
Problem 16
Two supplied modes are beta-minus decay of ³²₁₅P and beta-plus decay of ²²₁₁Na.
Part a
³²₁₅P → ³²₁₆S + e⁻ + ν̄. A stays 32; charge 15 = 16−1; lepton number 0 = +1−1.
Why this step? Neutron-to-proton conversion raises Z and emits an electron plus antineutrino.
²²₁₁Na → ²²₁₀Ne + e⁺ + ν. A stays 22; charge 11 = 10+1; lepton number 0 = −1+1.
Why this step? Proton-to-neutron conversion lowers Z and emits a positron plus neutrino.
Answer and check
Both complete equations conserve A, charge, and lepton number.
Part b
Electron and positron have equal masses and opposite charges −e and +e. Neutrino/antineutrino are neutral with negligible mass for this course; they interact via weak interaction and gravity and very little with ordinary matter.
Why this step? Particle properties explain the charge balance and the rarity of neutrino interactions.
Only this bookkeeping and qualitative weak interaction are needed; flavors and detailed distinguishing properties/weak-force mechanisms are excluded.
Why this step? Respect the explicit AP boundary.
Answer and check
Opposite electron/positron charges, equal masses; neutral weakly interacting neutrino partners are difficult to detect.
Scoring and feedback
Problem 17
A hypothetical single-electron discharge source has levels −8.0, −3.0, and −1.0 eV. One of its visible emission lines shines on a surface of provided work function 1.50 eV. Use hc = 1240 eV·nm.
Part a
The gaps are 5.0,7.0, and 2.0 eV, giving 248,177, and 620 nm. The 3→2 transition (−1 to −3 eV) makes the 620 nm line.
Why this step? Photon energy is a level difference rather than the emitting state’s absolute energy.
Its 2.0 eV exceeds 1.50 eV, so Kmax = 0.50 eV and Vs = 0.50 V.
Why this step? Combine discrete atomic emission with the material threshold.
Answer and check
248,177,620 nm; the 620 nm line ejects electrons with Kmax = 0.50 eV.
Part b
Power doubles because energy per photon stays 2.0 eV. Photoemission rate generally increases with absorbed flux, while maximum energy and ideal stopping voltage remain 0.50 V.
Why this step? Flux and packet energy influence different observables.
Collection efficiency, background current, and changing illumination footprint can affect measured current; hold them fixed to test the prediction.
Why this step? Separate ideal energy accounting from detector-dependent event rates.
Answer and check
More power and generally more electrons; unchanged ideal stopping voltage.
Scoring and feedback
Problem 18
A thermal X-ray source is approximately blackbody in a supplied idealized scenario, with spectral peak at 10.0 pm. A monochromator selects photons near 10.0 pm, which scatter at 90° from free electrons initially at rest.
Part a
T = b/λmax = (2.90 × 10⁻³)/(10.0 × 10⁻¹²) = 2.90 × 10⁸ K. This is a supplied ideal model, not a claim about an ordinary classroom lamp.
Why this step? Wien’s law uses absolute temperature and vacuum peak wavelength.
A blackbody emits a continuum, so photons have a distribution of energies. Selecting a narrow band allows a single approximate λ and E = hc/λ for that beam.
Why this step? A spectral peak is not monochromatic emission.
Answer and check
T ≈ 2.90 × 10⁸ K; selection narrows the continuous spectrum.
Part b
λ′ = 10.0 + 2.43 = 12.43 pm. Plot wavelength versus detection angle; the shift should follow 2.43(1−cos θ) pm. At 90° the photon leaves along y and the electron’s recoil must cancel its y momentum while carrying initial x momentum.
Why this step? Compton scattering changes energy and requires recoil, while ideal reflection at a stationary surface preserves frequency.
Measure calibration uncertainty and use several angles. A single shift without known target initial state is insufficient to establish the model.
Why this step? Test angle dependence and assumptions rather than relying on one number.
Answer and check
12.43 pm; angle-dependent shift plus vector recoil supports Compton scattering.
| Vector | x (10⁻²³ kg·m/s) | y (10⁻²³ kg·m/s) |
|---|---|---|
| Incoming photon | 6.630 | 0 |
| Outgoing photon | 0.000 | 5.334 |
| Recoil electron | 6.630 | -5.334 |
| Outgoing sum | 6.630 | 0 |
The incoming photon runs right from the common tail. The outgoing photon runs at +90°. The electron vector begins at the outgoing photon head and ends at the incoming photon head; its physical direction is -38.8° from +x. Translating a vector for a head-to-tail sum does not move its physical scattering origin. The target is a free electron initially at rest.
Scoring and feedback
Problem 19
A detector records total count rates 810,410,210,110 counts/min at t = 0,2,4,6 h for a supplied beta-minus parent ᴬZX. Background measured separately is 10 counts/min. Detector efficiency and geometry are constant; each daughter promptly emits a gamma photon and is then stable.
Part a
Subtract background to get 800,400,200,100 counts/min, which halve every 2 h. Thus t1/2 = 2.0 h and λ = ln2/2.0 = 0.347 h⁻¹.
Why this step? Observed rates track parent number only after constant background and detection conditions are accounted for.
Plot ln(R/R0) against t: points 0,−0.693,−1.386,−2.079 give slope −0.347 h⁻¹. Repeat equal-duration counting windows and propagate scatter/background uncertainty, especially at late times.
Why this step? The logarithmic transform tests exponential survival; a constant background would otherwise distort the tail.
Answer and check
2.0 h; λ ≈ 0.347 h⁻¹; log corrected-rate slope −λ.
| Time (h) | Corrected rate | Log ratio |
|---|---|---|
| 0 | 800 | 0.000 |
| 2 | 400 | -0.693 |
| 4 | 200 | -1.386 |
| 6 | 100 | -2.079 |
| 8 | 50 | -2.773 |
Each interval of 2 h halves the remaining amount. The ordinary curve bends upward toward zero; its absolute decrease gets smaller. The log graph is a straight line of slope −ln2/2 = -0.347 h⁻¹. Constant background is subtracted before transforming count rate; efficiency and geometry must be constant.
Part b
ᴬZX → ᴬ(Z+1)Y* + e⁻ + ν̄; then ᴬ(Z+1)Y* → ᴬ(Z+1)Y + γ. Beta changes the element and isotope identity via Z while A stays fixed. Gamma changes only nuclear energy.
Why this step? Distinguish a nucleon identity conversion from an excited-state transition.
Electron +1 and antineutrino −1 lepton numbers balance zero; daughter charge plus electron equals the parent charge. Photons and daughter recoil carry energy/momentum.
Why this step? The equations must include all conserved inventories.
Answer and check
Beta changes Z by +1; gamma leaves A and Z fixed and lowers the same nucleus’s energy.
Part c
No. The curve represents many stochastic events. A changing efficiency, added/lost parents, multiple unresolved isotopes, variable background, or nonprompt daughter activity could spoil a simple one-isotope fit.
Why this step? An ensemble average and an individual outcome are different; a fit tests specified measurement assumptions.
Answer and check
Individual times remain indeterminate; validate sample and detector conditions.
Scoring and feedback
Explain and apply: worked solutions
Compare the physical setup and the reasoning, as well as the final answer. Give credit for equivalent correct reasoning, using the rubric to find your next step.
Do higher-energy photons arrive first?
Photon R has vacuum wavelength 900 nm and photon S has vacuum wavelength 300 nm. They are emitted at the same instant and travel equal straight 6.00 m paths in free space. Use c = 3.00 × 10⁸ m/s and h = 6.63 × 10⁻³⁴ J·s. A separate two-opening test with the same light records individual detector clicks that accumulate into fringes.
Part a
Compare R and S by frequency, energy per photon, and vacuum momentum. Calculate both free-space speeds and both travel times, then evaluate the claim that the higher-energy photon reaches the detector first. State why the speed comparison does not depend on the chosen frequencies.
R: f = 3.33 × 10¹⁴ Hz, E = 2.21 × 10⁻¹⁹ J, p = 7.37 × 10⁻²⁸ kg·m/s. S: f = 1.00 × 10¹⁵ Hz, E = 6.63 × 10⁻¹⁹ J, p = 2.21 × 10⁻²⁷ kg·m/s. Both speeds are c = 3.00 × 10⁸ m/s and both travel times are 20.0 ns. The claim is false: all photons in free space have speed c independently of frequency or energy.
- Use f = c/λ₀, E = hf, and p = h/λ₀. S has three times each of R’s frequency, energy, and momentum.
- Apply the universal free-space photon speed to each photon rather than treating added energy as a massive-particle speed increase.
- Compute tR = tS = 6.00/(3.00 × 10⁸) = 2.00 × 10⁻⁸ s. Equal path and simultaneous emission give equal arrival time.
Scoring criteria
- Gives both speed values equal to c and explicitly states independence from frequency/energy.
- Obtains equal 20.0 ns travel times and rejects the faster-higher-energy claim.
- Correctly distinguishes the factor-three frequency/energy/momentum comparison from the equal-speed comparison.
Part b
Explain which feature of the two-opening observations calls for wave behavior and which calls for particle-like energy transfer. A student says that the individual clicks rule out a wave description. Evaluate that statement for the whole set of observations.
The fringes require phase-dependent superposition, a wave-like description. Individual localized detector interactions support discrete photon energy transfer. Separate clicks do not rule out wave behavior: accumulated events form the interference pattern, so the same light exhibits both behaviors.
- Separate the observation of one localized event from the spatial pattern accumulated over many events.
- Use wave superposition for fringes and photon interactions for localized energy delivery. Neither feature alone accounts for the complete observation set.
Scoring criteria
- Identifies fringes as interference and connects them to a wave description.
- Connects localized detector clicks to particle-like photon events.
- Rejects the either/or claim by accounting for both features of the same light.
Part c
A uniform slab on R’s path has index n = 1.50 in the supplied propagation model. At a stationary interface and with no absorption, compare R’s effective speed, frequency, wavelength, and energy inside the slab with its free-space values. Does that medium result change the free-space comparison in part a?
Inside the slab v = c/1.50 = 2.00 × 10⁸ m/s and λ = 900/1.50 = 600 nm. Frequency remains 3.33 × 10¹⁴ Hz and photon energy remains 2.21 × 10⁻¹⁹ J. This effective material propagation does not change the universal free-space speed comparison.
- Use v = c/n and preserve frequency at the stationary interface.
- Use λ = v/f to obtain 600 nm, and E = hf to keep the energy unchanged.
- Identify the changed medium assumption; the equal-path free-space calculation does not apply unchanged to a path containing a slab.
Scoring criteria
- Obtains effective speed 2.00 × 10⁸ m/s and wavelength 600 nm.
- Preserves f and hf at the stationary no-absorption interface.
- Keeps the material propagation statement separate from the universal free-space condition.
Return to the unit problem →Try this problem in its lesson →
A speed claim in free space
Two photons with different frequencies leave together along equal free-space paths. Photon B has twice photon A’s energy. Choose the best speed and arrival-time comparison.
Part a
Select the statement that follows from the free-space photon model.
They both travel at c and arrive together, despite B’s larger frequency and energy.
- Energy E = hf distinguishes the photon frequencies.
- The free-space speed of every photon is c; equal path and equal emission time therefore give equal arrival time.
Scoring criteria
- Selects the equal-c/equal-arrival statement.
- Explains that the speed is independent of frequency and energy under the free-space condition.
Return to the unit problem →Try this problem in its lesson →
Derive the ring’s momentum and energy rules
An electron of mass m = 9.11 × 10⁻³¹ kg is confined to an ideal circular ring of fixed circumference C = 1.50 nm. Its potential energy is constant and defined as zero. A nonzero circulating matter wave must match its phase after one circuit: C = |n|λ for integer n; sign labels the direction of circulation. Use h = 6.63 × 10⁻³⁴ J·s, λ = h/|pₛ|, K = pₛ²/(2m), and 1 eV = 1.60 × 10⁻¹⁹ J. The ideal model also allows a constant-phase n = 0 state.
Part a
Derive the signed allowed circulation momentum pₛ(n) and the allowed energy Kₙ in terms of n, h, C, and m. Explain why a continuously adjustable classical ring momentum is incompatible with the stated wave boundary condition.
pₛ(n) = nh/C and Kₙ = n²h²/(2mC²), with integer n and n = 0 giving zero in this model. Intermediate circulation momenta would not match the starting phase after one circuit, so this model has a discrete set of circulation momenta and energies.
- For nonzero n, substitute λ = C/|n| into |pₛ| = h/λ to obtain |pₛ| = |n|h/C. Restore the circulation sign to get pₛ = nh/C.
- Substitute that momentum into K = pₛ²/(2m); the integer label restricts energy as well as momentum.
- Explain the phase-matching constraint rather than deriving quantization from classical force balance.
Scoring criteria
- Derives pₛ = nh/C from both the boundary condition and de Broglie relation.
- Derives Kₙ = n²h²/(2mC²).
- Explains exclusion of intermediate states and retains the explicit ring model scope.
Part b
Calculate the allowed pₛ and K for n = 0, +1, −1, and +2. Compare the +1→+2 momentum step and energy gap. Test whether pₛ = 1.5h/C is allowed, and whether changing +1 to −1 must change the energy.
The momentum unit h/C is 4.42 × 10⁻²⁵ kg·m/s and K₁ = 0.670 eV. The listed states have (pₛ, K) = (0, 0), (+4.42 × 10⁻²⁵, 0.670 eV), (−4.42 × 10⁻²⁵, 0.670 eV), and (+8.84 × 10⁻²⁵ kg·m/s, 2.68 eV). The +1→+2 step is h/C and the energy gap is 3K₁ = 2.01 eV. The 1.5h/C momentum is excluded. Reversing +1 to −1 reverses circulation without changing K.
- Calculate h/C = 4.42 × 10⁻²⁵ kg·m/s and K₁ = (h/C)²/(2m) = 1.07 × 10⁻¹⁹ J = 0.670 eV.
- Multiply pₛ by n and K₁ by n² for each state.
- Apply integer phase matching to reject n = 1.5 and square the sign to see the equal ±1 energies.
Scoring criteria
- Gives the four allowed momentum values with signs and units.
- Gives energies 0, 0.670, 0.670, and 2.68 eV and calculates a 2.01 eV energy gap.
- Rejects the half-integer circulation state and explains opposite-direction energy equality.
Part c
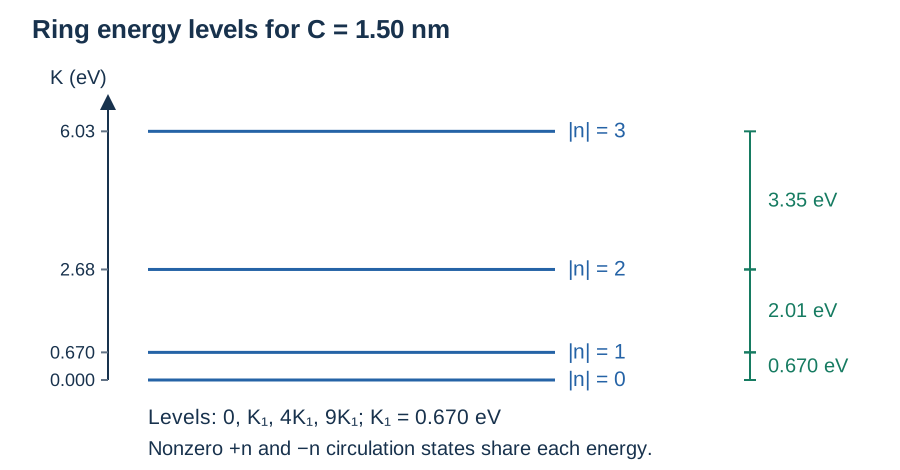
Sketch the allowed energy levels for |n| = 0, 1, 2, and 3 on a labeled energy axis using the calculated K₁. Compare the successive gaps, and evaluate: “This proves every Cartesian momentum component of every bound quantum system has discrete measured values.” State the defensible conclusion from this model.
Draw horizontal levels at 0, 0.670, 2.68, and 6.03 eV. The successive energy gaps are 0.670, 2.01, and 3.35 eV; they increase even though circulation momentum steps have equal size. The quoted universal claim does not follow. The model proves discrete energies and circulation-momentum states for this fixed ring with its boundary condition, not a general statement about every Cartesian momentum measurement in every bound system.
- Use Kₙ = n²K₁ to place levels at 0, K₁, 4K₁, and 9K₁.
- Subtract adjacent energies, obtaining K₁, 3K₁, and 5K₁. Label the energy axis in eV with unequal level spacings.
- Identify the demonstrated variable and geometry. A model-specific circulation rule cannot establish the universal Cartesian-component claim.
Scoring criteria
- Sketches correctly ordered levels with unequal spacing and an energy axis with eV units.
- Computes or correctly expresses all three increasing energy gaps.
- Explicitly rejects the universal Cartesian momentum claim and names the fixed-ring circulation scope.
Inspect diagram labels
The diagram keeps its full size here. Focus the view and use the arrow keys, or scroll across it, to inspect every label.
Return to the unit problem →Try this problem in its lesson →
Locate the charge, then draw its force
Consider a neutral hydrogen atom with one proton and one electron. Use illustrative atomic and nuclear radii 1.0 × 10⁻¹⁰ m and 1.0 × 10⁻¹⁵ m. In a separate historical Bohr model, put the nucleus at the origin and the electron at x = +r, with r = 2.12 × 10⁻¹⁰ m and counterclockwise circular motion. Use k = 8.99 × 10⁹ N·m²/C², e = 1.60 × 10⁻¹⁹ C, m = 9.11 × 10⁻³¹ kg, and h = 6.63 × 10⁻³⁴ J·s.
Part a
Draw a labeled spatial schematic of the neutral atom showing the signs of charge, the small nuclear region, and the electron outside it. Calculate the nuclear-to-atomic radius ratio and explain why a readable nucleus inset is not to scale. Evaluate a diagram that places negative electrons inside the positive nucleus while retaining the same particle counts.
The tiny central nucleus contains the +e proton; the −e electron surrounds it outside the nuclear region. The neutral total is zero. The radius ratio is 10⁻⁵, so a nucleus drawn large enough for a label is enlarged relative to the atom. Placing the electron inside the nucleus misrepresents spatial atomic structure even though total charge and particle counts match.
- Separate spatial positions from inventory counts: the positive nuclear region is small and the electron is outside it.
- Calculate (1.0 × 10⁻¹⁵)/(1.0 × 10⁻¹⁰) = 1.0 × 10⁻⁵.
- Label an enlarged inset explicitly and reject the misplaced-electron diagram. No literal electron orbit is needed for this spatial schematic.
Scoring criteria
- Shows a small positively charged nuclear region and a negatively charged electron spatially outside it.
- Computes 10⁻⁵ and identifies an enlarged nucleus drawing as not to scale.
- Explains the spatial error independently of correct total charge or counts.
Part b
For the separate Bohr model, draw the instantaneous velocity, electric force, and acceleration directions at x = +r. Calculate the force magnitude and speed by equating electric attraction to centripetal force. Explain why the force is not along the velocity.
Velocity points +y; force and acceleration point −x toward the nucleus. F = ke²/r² = 5.12 × 10⁻⁹ N and v = √(Fr/m) = 1.09 × 10⁶ m/s. The inward force is perpendicular to the tangent velocity at this point and changes its direction, supplying centripetal acceleration.
- Use opposite charges to direct the force toward the origin. Counterclockwise tangential velocity at the right-hand point points upward.
- Compute F = (8.99 × 10⁹)(1.60 × 10⁻¹⁹)²/(2.12 × 10⁻¹⁰)².
- Set F = mv²/r and solve for v. Explain that centripetal acceleration turns the velocity rather than pointing along it.
Scoring criteria
- Gives correct +y velocity and −x force/acceleration directions.
- Calculates 5.12 × 10⁻⁹ N and 1.09 × 10⁶ m/s with the electric centripetal relation.
- Explains the inward force’s role in changing direction.
Part c
Calculate the electron’s de Broglie wavelength and the approximate number of wavelengths around this Bohr circumference. Explain why force balance alone does not select allowed energy states, and give the historical model’s useful scope.
λ = h/(mv) ≈ 6.67 × 10⁻¹⁰ m; 2πr ≈ 1.33 × 10⁻⁹ m, giving about two wavelengths. The added integer wave fit restricts allowed states; force balance alone permits continuous circular states. The Bohr model combined classical motion with quantization to explain hydrogen’s discrete levels and is useful here for single-electron energy-level comparisons, without being a complete description of all atoms.
- Use the computed nonrelativistic v in λ = h/(mv).
- Compute 2πr/λ ≈ 2.00 with the rounded constants; interpret the integer matter-wave fit.
- Distinguish classical orbit balance from the quantization condition and name the historical hydrogen/discrete-level role.
Scoring criteria
- Finds λ ≈ 0.667 nm and an approximately two-wavelength circumference.
- Explains why an integer boundary condition supplies the missing state restriction.
- Names the historical hydrogen/discrete-energy role and limits the model to the supplied single-electron/energy-level description.
Return to the unit problem →Try this problem in its lesson →
Which material emits, and which absorbs?
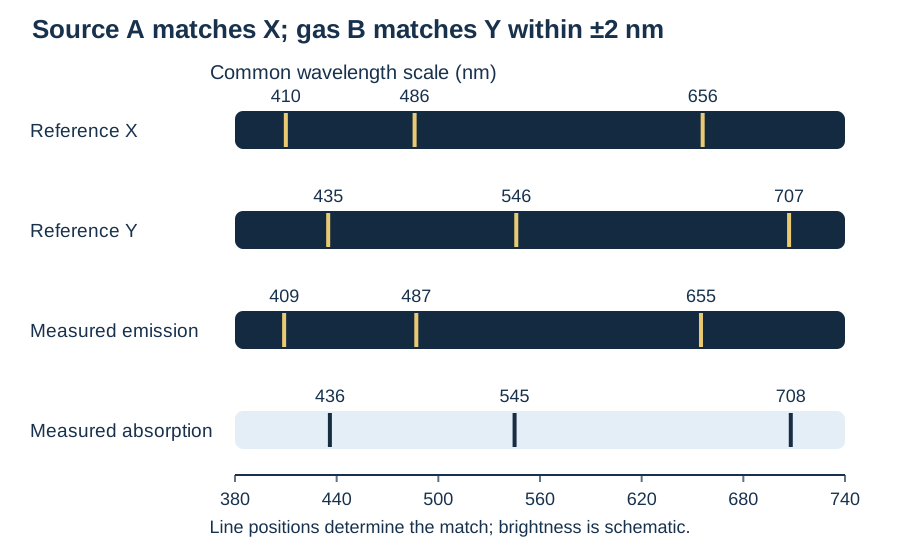
Reference X has resolved strong lines at 410, 486, and 656 nm. Reference Y has resolved strong lines at 435, 546, and 707 nm. Source A shows bright lines at 409, 487, and 655 nm. In a separate setup, a continuous lamp is viewed through cool gas B and dark lines occur at 436, 545, and 708 nm. Each measurement has uncertainty ±2 nm. Use only these supplied candidate references; no other component is ruled out by this dataset.
Part a
Identify the best supplied reference for source A and for gas B, using all measured line positions and their uncertainty. Explain why the two setups can identify different materials and why a single coincident line would be weaker evidence.
Source A best matches X: offsets −1, +1, −1 nm all fall within ±2 nm. Gas B best matches Y: offsets +1, −1, +1 nm all fall within ±2 nm. Bright source lines describe emitted photons; dark gas lines describe photons removed from the continuous beam. The source and absorber are separate materials. Multiple matching lines are stronger than one possible coincidence among candidate line sets.
- Compare source measurements to X and Y on a common wavelength scale; retain the ±2 nm tolerance.
- Compare the missing wavelengths from the gas with the reference absorption positions set by the corresponding permitted gaps.
- Distinguish the emitting source from the absorbing gas and state the limits of candidate identification.
Scoring criteria
- Identifies X for A and Y for B with three explicit wavelength matches for each.
- Uses uncertainty rather than demanding exact numerical equality.
- Explains emission versus absorption material roles and the strength of a multi-line comparison.
Part b
Draw aligned qualitative emission and absorption spectra with a common wavelength axis from 380 to 740 nm. Mark the measured line positions, distinguish bright lines from dark lines on a continuous background, and explain the atomic energy-transfer direction in each setup.
The emission strip has bright lines at 409, 487, and 655 nm. The absorption strip has a continuous band with dark notches at 436, 545, and 708 nm. In emission, excited atoms transition downward and transfer a matching energy gap to a photon. In absorption, photons with matching gaps raise populated atoms to higher states. Label wavelength in nm and use the same horizontal scale.
- Put both strips on the same wavelength axis and locate each line numerically.
- Represent emission as added bright lines and absorption as missing lines against a continuous background.
- Explain downward versus upward bound-state energy transfer with photon energy equal to the corresponding gap.
Scoring criteria
- Uses a common labeled wavelength axis with nm units and places all six lines correctly.
- Distinguishes bright emission from dark absorption on a continuum.
- Explains both transition directions and the matching photon energy condition.
Part c
A separate hypothetical single-electron atom has levels −8.0, −3.0, and −1.0 eV. A photon corresponding to the −3.0→−1.0 eV gap passes through gas whose atoms are all in the −8.0 eV ground state. Must that line be absorbed? Explain using its energy, the occupied starting level, and the ground-state ionization threshold. Compare the removal energies from all three levels and explain why the ground state requires the greatest removal energy.
The photon energy is 2.0 eV. Ground-state upward gaps are 5.0 and 7.0 eV, so it cannot drive these bound transitions when every atom begins at −8.0 eV. It is also below the 8.0 eV ionization threshold. A line can correspond to an allowed gap without being absorbed from the actual populated state. The excited levels have smaller removal energies of 3.0 and 1.0 eV than the ground state’s 8.0 eV.
- Find the proposed gap: (−1.0) − (−3.0) = 2.0 eV.
- Compare with transitions leaving the occupied ground level, not every pair in the diagram.
- Compare binding energies relative to the zero-energy separated state: 8.0, 3.0, 1.0 eV.
Scoring criteria
- Finds 2.0 eV and rejects ground-state bound absorption using both possible upward gaps.
- Uses the 8.0 eV ionization threshold correctly.
- Explains occupancy and explicitly compares the ground state’s greatest removal energy with excited-state values.
Inspect diagram labels
The diagram keeps its full size here. Focus the view and use the arrow keys, or scroll across it, to inspect every label.
Return to the unit problem →Try this problem in its lesson →
Binding, energy release, and recoil
Use representative nuclear binding separations of 1.5 fm and an atomic separation of 10⁻¹⁰ m, with 1 fm = 10⁻¹⁵ m. A supplied fusion channel is ²₁H + ³₁H → ⁴₂He + ¹₀n, with bare nuclear masses 2.013553, 3.015501, 4.001506, and 1.008665 u respectively. Its center-of-momentum frame has zero initial total momentum and negligible initial kinetic energy; the only final products are helium and neutron. Use k = 8.99 × 10⁹ N·m²/C², e = 1.60 × 10⁻¹⁹ C, 1 u·c² = 931.5 MeV, and the stated nonrelativistic final-product approximation K = p²/(2m). A separate supplied fission channel is ²³⁵₉₂U + ¹₀n → ¹⁴¹₅₆Ba + ⁹²₃₆Kr + 3¹₀n.
Part a
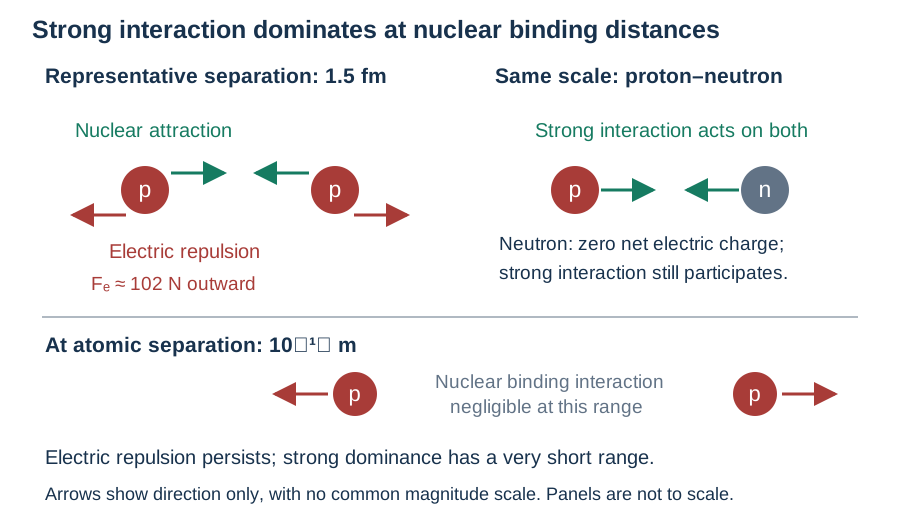
Explain which interaction dominates nucleon interactions at typical nuclear binding separations and why a nucleus containing mutually repelling protons can be bound. Include proton–neutron and neutron–neutron interactions. Calculate the proton–proton electric-force magnitude at 1.5 fm, draw its direction, and explain why the short-range binding interaction does not dominate two protons separated by 10⁻¹⁰ m.
The strong interaction dominates among nucleons at nuclear binding separations, including pairs involving neutrons; zero net electric charge does not eliminate the strong interaction. Protons still repel electrically: Fₑ = ke²/r² = 1.02 × 10² N, directed away from each other. Strong binding can overcome proton electric repulsion at typical nuclear distances. At 10⁻¹⁰ m the nuclear interaction is negligible because of its extremely short range, whereas electric repulsion persists. This is not an assertion of simple attraction at every possible nuclear separation.
- Identify both nucleons as strong-interaction participants, regardless of their different net electric charges.
- Apply Coulomb’s law with r = 1.5 × 10⁻¹⁵ m and direct the force outward on each positive proton.
- Explain nuclear-scale dominance and contrast the atomic separation with the short range. The electric inverse-square calculation is not a strong-force law.
Scoring criteria
- Explicitly states strong-interaction dominance at nuclear scale and participation of both protons and neutrons.
- Uses that interaction to explain binding despite electric proton repulsion.
- Calculates about 102 N outward electric force and explains why nuclear binding is negligible at atomic separation.
Part b
For the supplied fusion channel, verify total nucleon number and electric charge, compute Q, and explain which energy is conserved and which mass quantity can change. Name the allowed forms of released energy in nuclear processes, then use the stated no-photon channel to account for this Q.
Fusion combines two smaller nuclei into helium plus a neutron. Nucleon number: 2 + 3 = 4 + 1; nuclear charge: 1 + 1 = 2 + 0. Δm = 0.018883 u, giving Q = 17.59 MeV. Total energy including rest energy is conserved; the sum of rest masses decreases. Nuclear release can appear as product kinetic energy and/or photons. Here no photons and negligible initial kinetic energy mean KHe + Kn = Q.
- Include the final free neutron in nucleon and charge bookkeeping.
- Subtract final bare nuclear masses from initial bare nuclear masses and multiply by 931.5 MeV/u.
- Distinguish conservation of total energy from equality of initial and final rest-mass sums; specify every energy carrier allowed by this channel.
Scoring criteria
- Balances nucleon number and charge including the neutron, and identifies combining nuclei as fusion.
- Computes Δm = 0.018883 u and Q ≈ 17.59 MeV with consistent bare nuclear masses.
- States total energy conservation, rest-mass conversion, general kinetic/photon release, and the specific sum KHe + Kn = Q.
Part c
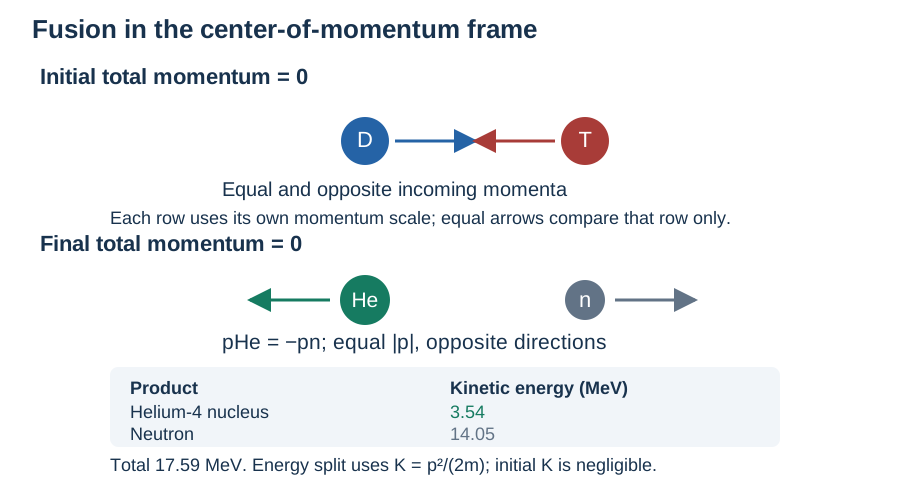
Draw the final-product momentum vectors in the center-of-momentum frame, state their magnitude and direction relationship, and derive the kinetic-energy ratio Kn/KHe. Calculate both kinetic energies and check their sum. Evaluate the claim that two products with equal momentum magnitudes must receive equal kinetic energies.
pHe = −pn, so the momenta have equal magnitudes and opposite directions. In the supplied nonrelativistic approximation Kn/KHe = mHe/mn = 3.967. Therefore KHe ≈ 3.54 MeV and Kn ≈ 14.05 MeV, summing to 17.59 MeV. Equal momentum magnitudes do not mean equal kinetic energies when the masses differ; the lighter neutron receives more. Small relativistic corrections and initial kinetic energy are excluded by the stated approximation.
- Set total final vector momentum to the initial zero: pHe + pn = 0.
- Use the same p² in K = p²/(2m) to obtain the inverse-mass energy ratio.
- Solve KHe + Kn = Q with the ratio and check the sum. Label arrows as momentum vectors on a common magnitude scale or explicitly equal magnitude.
Scoring criteria
- Draws equal and opposite momenta and states vector momentum conservation.
- Derives the inverse-mass kinetic-energy ratio and rejects the equal-energy claim.
- Gives approximately 3.54 and 14.05 MeV, verifies their sum, and retains the supplied approximation.
Part d
Contrast the supplied fusion and fission channels by what the nuclei do. Verify the fission channel’s total nucleon number and charge, including every free neutron. Explain why a positive-Q fission pathway can still need neutron capture or excitation rather than making every parent split immediately; relate fusion’s close-approach requirement to the short range discussed in part a.
Fusion combines the small hydrogen nuclei into helium while emitting a neutron. Fission splits the heavy uranium nucleus into two smaller nuclei plus neutrons. In the supplied fission, A: 235 + 1 = 141 + 92 + 3 = 236, charge: 92 = 56 + 36. A positive final Q does not remove the barrier or specify the reaction rate: some pathways are spontaneous and others require capture or excitation. Fusion’s positive nuclei must overcome electric repulsion to reach the short nuclear-interaction range.
- Classify combining versus splitting from the complete equations, not from whether energy is released.
- Count the three final neutrons as well as the one initial neutron.
- Distinguish the initial-to-final Q balance from a pathway barrier and connect close approach to nuclear force range.
Scoring criteria
- Correctly contrasts fusion and fission including emitted particles.
- Balances fission A = 236 and charge = 92 with all neutrons counted.
- Explains spontaneous versus initiated fission and why positive Q does not remove an initiation barrier; links fusion to short-range binding.
Inspect diagram labels
The diagram keeps its full size here. Focus the view and use the arrow keys, or scroll across it, to inspect every label.
Inspect diagram labels
The diagram keeps its full size here. Focus the view and use the arrow keys, or scroll across it, to inspect every label.
Return to the unit problem →Try this problem in its lesson →
Can a neutral neutron take part in binding?
A student observes that neutrons have zero net electric charge and claims that the nucleus must be held together entirely by electric attraction. Choose the best explanation of binding among protons and neutrons.
Part a
Select the explanation that accounts for both the nucleon types and the relevant distance scale.
The strong interaction dominates nucleon interactions at nuclear scales, including neutrons, while proton electric repulsion still matters.
- A neutron’s net electric charge describes its Coulomb interaction in the AP model; it does not remove the neutron’s strong interaction.
- At nuclear binding distances strong interaction dominates nucleon interactions; its very short range limits extrapolation to separated atoms.
Scoring criteria
- Selects nuclear-scale strong dominance with both nucleon types.
- Explains why electric neutrality does not exclude strong binding.
Return to the unit problem →Try this problem in its lesson →